This resource is part of the AHA’s Teaching with #DigHist series.
By Julia M. Gossard (Utah State Univ.)
Over the course of the semester, the class will create a digital map of the early modern world, starting with Europe and branching out to the New World and the east. An interactive Google map that demonstrates how people, goods, and ideas flowed to/from Europe during the period will showcase the connectivity of the early modern globe as well as continuities and changes in history.
Students are required to submit 4 entries to the digital assignment over the course of the semester (see below for a list of due dates). These entries will be ~150–200 words in length. At the end of the semester, students will reflect on the assignment in a two-page report, demonstrating how this map acted as a supplemental learning tool.
There is a three-step process to each entry:
- Claim your entry via the shared Google Spreadsheet. Make sure you’re not repeating an entry. Stake your claim by entering the name for your entry and your name under “Author.” You’ll enter the rest of the data back in on step 3.
- Submit your entry. The instructor will grade it and give you feedback. Make changes to your entry as necessary based upon the feedback.
- Upload your entry to the Google Map.
You’re encouraged to add to your classmates’ entries. This is especially important for the “Connected to” column. You may earn additional (extra credit) points by commenting, correcting, adding to your peers’ posts. This will prove VERY helpful on the exams!!
What goes into an entry:
- Entries are about 150–200 words in length. They can be a person, a place, an event, a commodity/thing, or an idea. If the entry doesn’t fit into one of those broad categories, it’s fine, just let the instructor know. Write in full sentences.
- Entry Name/Title – make it easy to understand
- Date(s) – Does not need to be exact year; Some entries may be centuries
- Location – Necessary for the map pinpoint!
- Historical Significance – The “why” does this matter. What is important about this entry? Did it effect history? Is it a representation of a particular theme? What’s the broader story here? Try to limit this to a few sentences.
- Important Notes – Anything that you deem to be particularly noteworthy about your entry. Sometimes this section will be left blank but if you find you’re left with extraneous material from the Historical Significance category then fill it in.
- Connected to – Are there other people, places, events, ideas, etc that this entry could be connected to? If so, mention it and then be sure to draw a line to that on the map.
- Author – That’s you! Don’t forget to put your name. If you edited the comment, place your initials like this: “Edit JMG”
How to post to the Google Map:
With the Google Map open in your browser:
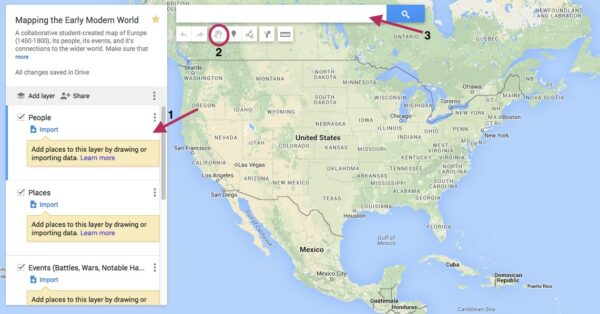
- Determine that you are posting in the correct “Layer.” To the left-hand side, there will be a white box that has the categories: People, Places, Events, Commodities/Things, Ideas. Be sure that you have the correct one selected. It will have a blue line next to the selected layer. [See Figure 1 below, Number 1]
- To navigate around the map, be sure the hand symbol [See Figure 1 below, Number 2] is selected. You can zoom in, zoom out, etc with the hand symbol to find your location. You can also search for a location using the search bear at the top [See Figure 1, Number 3].
Figure 1

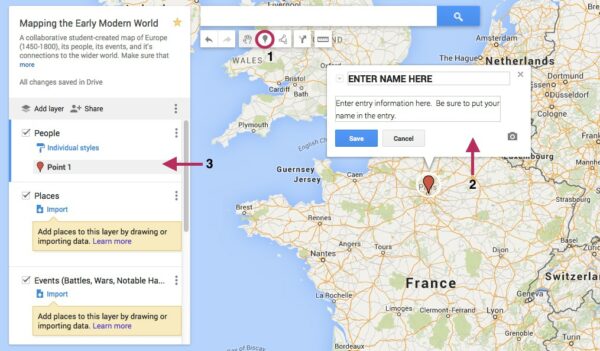
- To drop a pin, make sure the pin symbol is selected [See Figure 2, Number 1]. Then click on the location where you want the pin to be placed.
- In the white box [See Figure 2, Number 2] enter the Name/Title and Entry information in the box. Be sure to put your name!
- Be sure that your pin shows up in the correct layer [See Figure 2, Number 3]
Figure 2

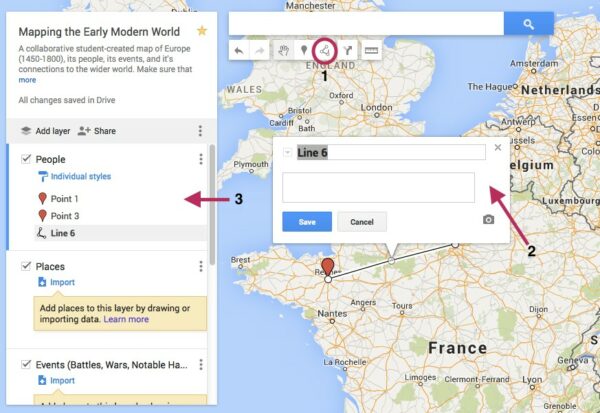
- Do you have connections to another entry on the map? Perhaps your entry is a commodity that is traded between the Netherlands and the New World; perhaps your Queen got married to a King in a different country. Add those connections by inserting a line. Be sure to look around at your classmates’ entries and see if you entries relate and then draw lines!
- To draw a line between to existing points:
- Make sure the line symbol is selected [See Figure 3, Number 1]
- In the white box [Figure 3, Number 2] name the line and give a brief description.
- Be sure that your line shows up in the correct layer [Figure 3, Number 3]
- To draw a line between to existing points:
Figure 3

- You’re done! Make sure your entry is both on the map and in the Excel Spreadsheet on Google.
For more on using Google Maps in the classroom, read Julia M. Gossard’s post on AHA Today, “Mapping the Early Modern World: Using Google Maps in the Classroom.”


